Floor map
How to use the live floor map: table status, creating and relocating bookings, seating walk-ins and joining tables.
What it’s for
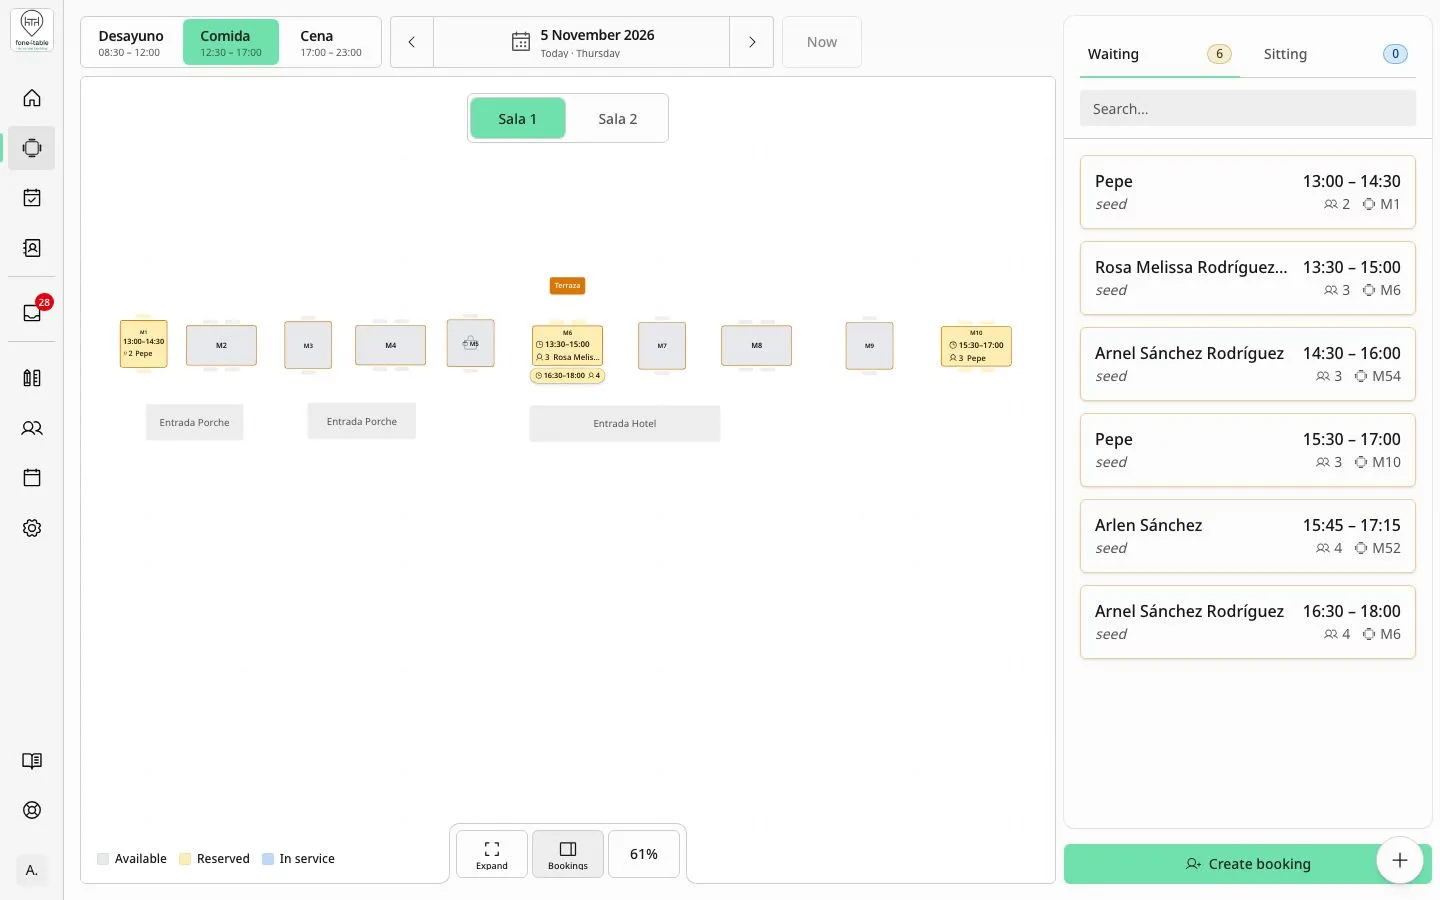
The floor map shows the restaurant’s floor plan in real time for a given day and shift: which tables are free, reserved or have customers seated. Staff run the service from here: they create bookings and walk-ins from a table, seat customers, complete bookings, assign or change tables and swap tables between bookings. To change the drawing of the floor plan (move tables, create areas) you use Customize Maps, not this screen.
How to get there
- Side menu → Maps.
- The restaurant’s first floor plan opens. If there are several floor plans (for example, ground floor and terrace), they appear as tabs above the map so you can switch between them.
- Within each floor plan, the Areas (dining zones) are drawn with their name and colour.
- If there’s no floor plan yet, the screen says so and offers Open map editor (admins only).
Parts of the screen
- Day and shift selector (top): Previous day / Next day arrows, the date to open the calendar, the shifts open that day and the Now button, which takes you back to the current day and shift. If today is closed, Now takes you to the next open day.
- Floor plan (centre): the tables with their status. The colour key is at the bottom left.
- Bottom bar: Bookings shows or hides the bookings side panel; Expand / Exit puts the map in full screen.
- Bookings side panel (right): Waiting tabs (bookings that haven’t arrived yet, with or without a table) and Sitting, each with its counter; a search box (Search…) and the list of bookings in the shift. At the bottom, the Create booking button.
Table statuses and colours
Each table’s status depends on the chosen day and shift: only bookings that start in that shift count.
- Available (light grey): no active bookings in that shift.
- Reserved (yellow): has a booking still to arrive (Waiting or Confirmed status).
- In service (blue): the customers are seated.
When you create or edit a booking, the map in the form adds Selected (main colour) for the tables you’ve chosen. When you relocate a booking, the key changes to Available, Recommended (star), Swappable (purple) and Unavailable (dimmed grey).
If an area is blocked for customer channels, the key shows “Blocked for web, WhatsApp, and phone calls”: customers can’t book there through those channels, but staff can still use it from the app.
Common tasks
View a table’s bookings
- Tap the table on the floor plan.
- The Table [name] card opens with its seats, its description and that table’s bookings in the shift. If there are several, the one in progress is marked as Current booking.
- Tap a booking to see its action buttons.
Create a booking from a table
- Tap the table on the floor plan.
- Tap Create booking.
- The form opens with that table already selected. The suggested start time is the end of that table’s last booking (if it falls within the shift) or the shift’s default time.
- Enter Amount of People, check Shift, Start Time and End Time, choose the Guest and, if you like, add a Note.
- Tap Confirm.
You can also create a booking without choosing a table first using the Create booking button in the side panel.
Seat a customer without a booking (walk-in)
- Tap Create booking (on a table or in the side panel).
- At the top of the form, switch from Booking to Walk-in.
- The start time is “now” and can’t be changed. The end time is calculated from the duration set for that number of people; you can adjust it.
- Enter Amount of People and tap the table or tables on the map where they’re sitting (you must choose at least one).
- The Guest is optional.
- Tap Seat walk-in. The table goes straight to In service.
If you didn’t choose a customer, you can link one later with Assign customer (on the seated booking or, once completed, from the Bookings list).
Seat the customers of a booking
- Find the booking in the side panel (Waiting tab) or tap its table.
- Tap the booking to see the actions and tap Sit.
- Confirm with Confirm (or Back to cancel).
You can only seat a booking that already has a table (Confirmed status) and is for today.
Complete a booking (the customers leave)
- In the Sitting tab or on the table, tap the booking.
- Tap Complete and then Confirm.
- If the restaurant has booking revenue switched on, Complete Booking opens so you can enter the amount in Revenue; tap Complete.
The table is freed up.
Assign a table to a booking that doesn’t have one
- Tap the booking in the side panel.
- Tap Assign table.
- Tap a free table on the map (or choose one of the Suggestions) and tap Confirm.
Move a booking to another table (relocate)
- Tap the booking and then Relocate.
- Assign tables opens with the message “Tap a free table, or a booked one to swap.”
- Tap one or more free tables or choose a Free · N seats suggestion.
- Tap Confirm.
Swap tables between two bookings
- Tap the booking and then Relocate.
- Tap a Swappable (purple) table or a Swap with [name] · [time] suggestion. All the tables of that other booking are selected.
- Check the warnings (for example, if the other booking is already Seated or if the party is larger than the seats); they’re only warnings and don’t stop the change.
- Tap Swap.
A swap can’t be mixed with free tables: either you choose free tables or you swap with another booking. Unavailable tables explain why they can’t be used when you tap them (for example, “Clashes with [name] [time]”).
Join tables for a party
- In the booking form (when creating, editing or relocating it), tap several tables on the map.
- If the selected tables don’t have enough seats, you’ll see the warning “The party is larger than the N seats of the selected tables”; you can carry on anyway.
- Tap Confirm.
For automatic bookings (bot, WhatsApp, web) to be able to join tables, an admin must define which tables can be joined in Side menu → Customize Maps → Groups. Automatic bookings only join tables from those groups.
Edit or cancel a booking from the map
- Tap the booking.
- Edit opens the full form with the map.
- Cancel asks for confirmation: tap Confirm to cancel it or Back to keep it.
Rules and limits
- Each shift only shows the bookings that start in it; a seated booking from the previous shift doesn’t colour the tables in the next one.
- A table is occupied from the booking’s start time to its end time. If seated customers stay longer, the table stays In service until the booking is completed.
- Sit only works on today’s bookings that have a table assigned.
- Cancel is only available on Waiting or Confirmed bookings; a seated booking isn’t cancelled, it’s completed.
- The system never moves tables that staff chose by hand. Only automatically assigned tables can change on their own (for example, if a customer changes the time by phone or WhatsApp).
- Staff can relocate a booking to any area.
- Moving a booking to another table doesn’t send the customer any notification.
- If the chosen day is closed in the Calendar, the map moves to the next open day.
Frequently asked questions
Why is the Sit button disabled? You can only seat bookings for the current day. If the booking is for another day, it can’t be seated yet. If it has no table, use Assign table first.
A table shows as free but the customers are still seated. Why? Check that you’re viewing the right shift: each shift only shows the bookings that start in it. Tap Now to go back to the current shift.
What does the yellow colour mean? The table is Reserved: it has a booking that hasn’t arrived yet. Blue means In service (customers seated) and grey, Available.
Can I seat more people than fit at a table? Yes. The app warns you that the party is larger than the seats, but lets you carry on.
How do I swap the tables of two bookings? Tap one of the bookings → Relocate → tap a purple (Swappable) table → Swap.
The system moved a booking to another table without me doing it. Is that normal? Yes, if the table had been assigned automatically by the system and the customer changed the booking. If staff chose the table, the system never moves it.
Can I move a booking to another area? Yes, from Relocate you can choose tables in any area and on any floor plan.
How do I add or move tables on the floor plan? From Side menu → Customize Maps. The floor map is only for running the service.
What does “Blocked for web, WhatsApp, and phone calls” mean? That area isn’t offered to customers through the automatic channels, but staff can book it from the app.
I created a walk-in without a customer. Can I add one later? Yes, with Assign customer on the booking. Bear in mind this can’t be undone.