Customize Maps (floor plan, area, table and table group editor)
How to draw the restaurant in Customize Maps: floor plans, areas, tables, capacities and table groups.
What it’s for
In Customize Maps you draw the restaurant as it really is: the floor plans (for example, ground floor and first floor), the Areas or zones on each floor plan (Main room, Terrace, Private room…), the Tables with their shape and number of seats, and decorative elements such as walls, bars or columns. The tables you create here are the ones the system uses to assign bookings, both the ones you make from the dashboard and the ones that come in by phone (bot), WhatsApp or the web. This is also where you define Table groups: which tables can be joined for large parties.
In the app, zones are called Areas. When staff talk about a “zone”, they mean the same thing.
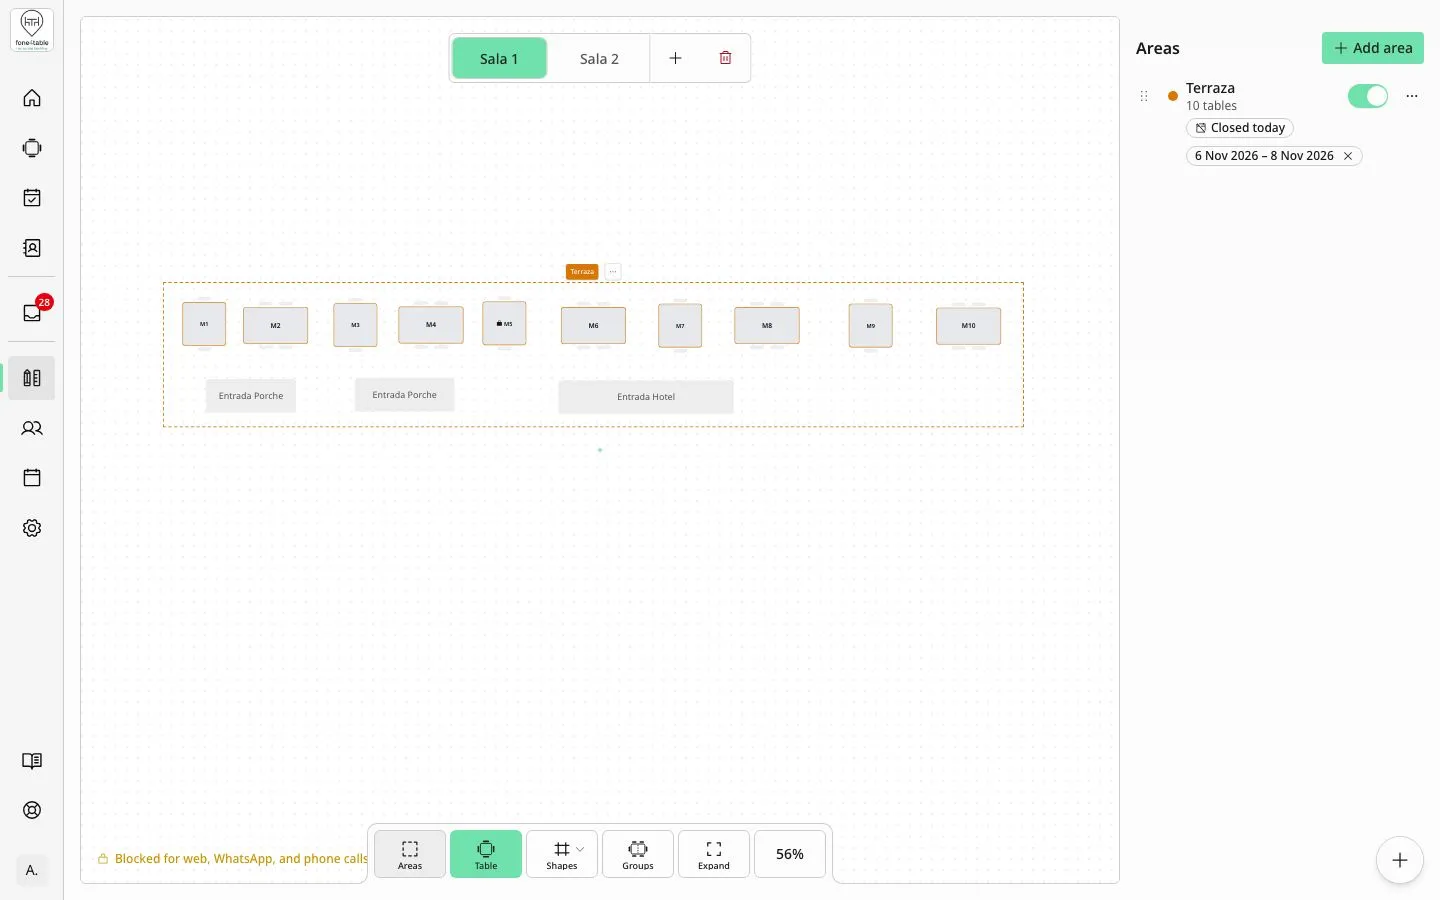
How to get there
- Sidebar → Settings section → Customize Maps.
- Table groups: inside Customize Maps, the Groups button in the map’s bottom bar.
- Only users with the Admin role can see it. Users with the User role don’t have this option in the menu.
- The old areas and maps options that used to be inside Settings no longer exist as a separate section: everything is now done in Customize Maps, including area closures.
Common tasks
Create the first floor plan
- Go to Customize Maps. If there’s no floor plan yet you’ll see the message “Create a floor plan to start using the map view.”
- Tap Add floor plan.
- Type the Floor plan name (for example, “Ground floor”) and tap Create floor plan.
Add another floor plan or delete one
- The floor plan tabs appear above the map. Tap the + button (Add floor plan) next to them to create another.
- To delete the open floor plan, tap the bin icon (Delete floor plan) next to the tabs and confirm.
- Careful: deleting a floor plan also deletes its areas and all their tables. This can’t be undone.
Create an area (zone)
- With the floor plan open, tap Areas in the bottom bar to show the areas panel (if it isn’t visible).
- Tap Add area.
- Type the Area name (e.g. Terrace) and tap Create area.
- On an empty floor plan you can also use the Add area button that appears in the middle (“This floor plan is empty”).
Tables always live inside an area: before you can add tables to a floor plan, at least one area must exist.
Rename, reorder, move or delete an area
- Rename: in the Areas panel, tap the area’s three dots → Edit area, change the name and tap Save. The tables stay where they are.
- Translate the name into other languages: three dots → Edit translations.
- Reorder: drag the area by the dotted handle on its left within the panel.
- Reposition the area on the floor plan: drag the coloured label with the area’s name that appears above its outline; it moves together with all its tables.
- Move the area to another floor plan: in the three-dot menu on the area’s label on the map, choose Move to floor plan and the destination floor plan.
- Delete: three dots → Delete area and confirm. Its tables and shapes are deleted too. This can’t be undone.
Close an area (zone) for some dates
- In the Areas panel, tap the area’s three dots → Block area for dates.
- In Schedule area closure, choose the Date range and, if you like, the Reason (optional) (e.g. “Private event”).
- Tap Schedule closure. If there are already bookings in that area on those dates, you’re warned (“There are N bookings in this area…”); you can tap Schedule anyway and relocate them yourself.
- Under the area’s name you’ll see Closed today (if the closure includes today) and each scheduled closure with its dates.
- To cancel a scheduled closure, tap the × next to its dates (Remove closure).
Close an area indefinitely
- In the Areas panel, switch off the area’s toggle.
- You’re asked to confirm (Lock area), with how many future bookings that area has, which you’ll need to manage and relocate.
- The area shows as Permanently closed. To open it again, switch the toggle back on.
Add a table
- Tap Table in the bottom bar (or, in an area’s three-dot menu, Add table).
- In Area, choose which area the table goes in.
- Type the Table Name (required, 4 characters maximum, e.g. “T1” or “12”).
- Optional: add a Description.
- Choose the shape: Squared, Circular or Rectangular, and then the template with the number of seats.
- Square and circular: 2, 4, 6 or 8 seats.
- Rectangular: 3, 4, 5, 6, 7, 8, 9, 10 or 12 seats.
- Tap Create Table. The table appears in the centre of the view (or inside the chosen area) and you can drag it into place.
Move, rotate and resize tables and shapes
- Click (or tap) the table or shape to select it.
- Move: drag it into place. If you drag a table over another area, the area lights up and the table moves into that area when you let go.
- Rotate: use the rotation control that appears above the selected element (it snaps to 0°, 45°, 90°…), or the Rotate (90°) button.
- Resize: rectangles and circles have handles on their edges to change their size. Tables can’t be resized: their size depends on the shape and the seats.
- When you select an element, buttons appear around it: Edit Table (or Edit), Block for customer channels (tables only), Rotate (90°) and Delete. On a computer you also have these options with a right-click, and for tables, Move to area.
Change a table’s name or seats
- Select the table and tap Edit Table (or right-click → Edit Table).
- Change the Table Name, the Description, the shape or the seat template.
- Tap Update Table.
Block a table for customers
- Select the table and tap Block for customer channels (padlock icon).
- The table becomes “Blocked for web, WhatsApp, and phone calls”: the bot, WhatsApp and online booking won’t assign it. Staff can still assign it from the dashboard.
- To remove the block, select it and tap Unblock for customer channels.
Add walls, bars and text (shapes)
- Tap Shapes in the bottom bar and choose Rectangle, Circle or Text.
- Type a Name (for example “Bar” or “Entrance”) and tap Create Rectangle, Create Circle or Create Text.
- Drag it into place and adjust its size or rotation. Shapes are purely decorative: they can’t be booked.
Create a table group (tables that can be joined)
- In Customize Maps, tap Groups in the bottom bar. Table groups opens.
- Tap Create group. New table group opens.
- On the map on the right, tap the tables that can be joined (at least two). You can switch floor plans with the Floor plan tabs. Under Tables you’ll see the selected ones and the message “The selected tables add up to N seats”.
- In Maximum capacity, enter the maximum number of people who fit at those tables joined together (from 1 to 999). It can differ from the total number of seats.
- Tap Create group. The group’s name is generated automatically from the table names (for example “T1-T2”).
- To change it, select the group in the list and tap Edit (then Save changes); to delete it, Delete (the tables aren’t deleted).
- To go back, tap Back to map editor.
Saving changes
There’s no save button in the editor: every change (move, rotate, resize, create, rename, delete) is saved automatically when you let go of the element or confirm the window. The floor plan’s zoom and framing are also remembered. The button with the zoom percentage in the bottom bar re-centres the view. Expand puts the editor in full screen (Exit to go back).
Rules and limits
- A table has a single number of seats (its capacity). There’s no minimum number of guests per table.
- Automatic assignment (bot, WhatsApp, web) only uses tables with enough seats for the party and prefers the closest fit. From the dashboard, staff can assign a table even if the party is larger than its seats (the app warns you).
- Automatic assignment only joins tables that are part of a table group, and only if the group allows that number of people (Maximum capacity). It prefers, in this order: a single table that isn’t in any group, a table that is in a group and, finally, a whole group.
- A group needs at least two tables. If tables are deleted and it’s left with fewer, it shows as Incomplete and must be edited or deleted.
- Table name: required and 4 characters maximum.
- To add tables or shapes to a floor plan, the floor plan needs at least one area.
- Deleting a floor plan, an area, a table or a shape can’t be undone.
- Blocked tables and closed areas aren’t offered to customers, but staff can use them from the dashboard.
- Area closures are for whole days, not hours, and don’t cancel or move existing bookings.
- A closed area is marked in that day’s Timeline (Closed, with its tables dimmed) and in the Calendar (Area closed: …).
- Only admins can open Customize Maps.
Frequently asked questions
Do I have to save after moving tables? No. Changes are saved automatically as soon as you let go of the table or confirm a window.
How do I set a minimum and maximum capacity for a table? Tables only have a number of seats, which you choose with the template when you create or edit it (Edit Table). There’s no minimum capacity: the system tries the smallest table the party fits at first. “Maximum capacity” only exists for table groups.
I need a round table with 5 seats. Is that possible? Square and circular tables allow 2, 4, 6 or 8 seats. Rectangular ones allow 3, 4, 5, 6, 7, 8, 9, 10 or 12.
Why doesn’t the bot join two tables for a party of 10? Because automatic assignment only joins tables that are in a table group with a high enough Maximum capacity. Create the group in Groups → Create group.
How do I move a table to another area? Drag it over the other area until it lights up and let go, or right-click → Move to area and choose the area.
It won’t let me add tables. The floor plan needs at least one area. Create one with Add area and try again.
How do I stop customers from booking a specific table? Select it and tap Block for customer channels. You’ll still be able to use it from the dashboard.
I want to close the terrace for a few days. Do I do that here? Yes. In the Areas panel, tap the terrace’s three dots → Block area for dates, choose the Date range and tap Schedule closure.
I see “Areas without floor plan”. These are old areas that aren’t on any floor plan yet and don’t appear on the map. Tap Add next to each one (or Add all to…) and then drag them into place.
If I delete a table group, are the tables deleted? No, only the group is deleted; the tables stay on the map.
A colleague can’t see “Customize Maps”. They have the User role. Only Admins can edit the maps; you change it in Users.