Settings: preferences and integrations
Restaurant settings: brand, booking duration, notifications, WhatsApp Business, Google Business Profile and call forwarding.
What it’s for
In Settings you adjust the restaurant’s details and look, booking duration, what customers are asked, notifications (reminders, reviews), the connection with WhatsApp Business and Google, and call forwarding to your phone or PBX.
Only admin users can see these options. Other users only see the Version & updates section.
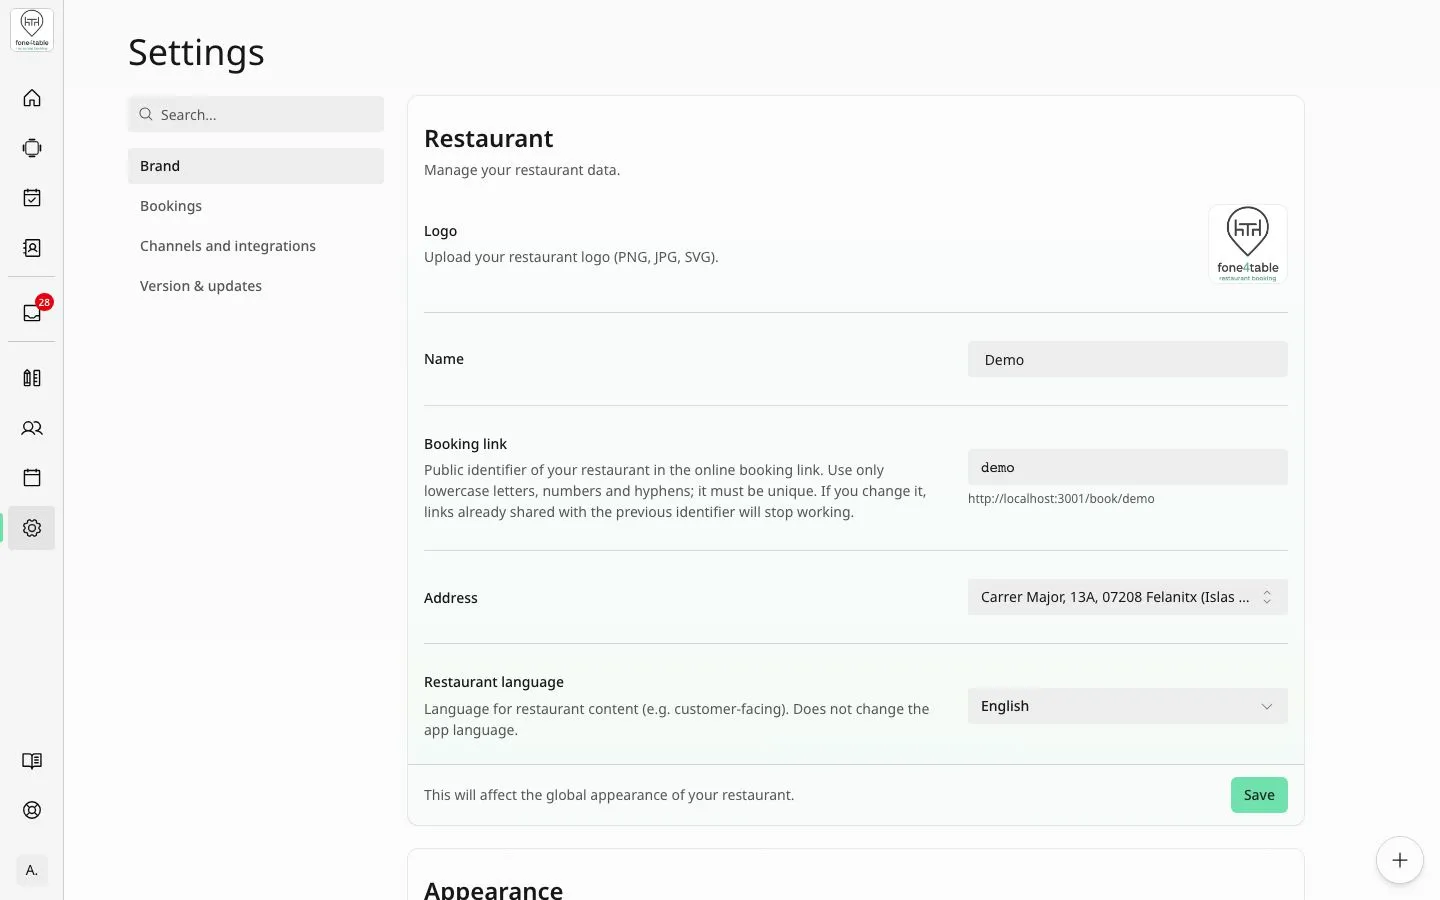
How to get there
Side menu → Settings group → Settings. On the left you’ll see the sections:
- Brand: restaurant details, booking link, language, colours and fonts.
- Bookings: booking duration and behaviour.
- Channels and integrations: WhatsApp, reminders, Google, wallet QR code and call forwarding.
- Version & updates: the installed version of the app.
Toggles and lists save automatically when you change them. Only the Restaurant block in Brand and the PBX form have a save button.
Common tasks
Change the default booking duration
- Go to Settings → Bookings.
- Under Duration, open Default Duration.
- Choose the duration (from 1 hour to 20 hours, in half-hour steps). It saves straight away and applies to new bookings.
Give large parties more time
- In Settings → Bookings, find Duration by party size.
- Tap Add range.
- In Party size range, enter the minimum and maximum number of people. If you don’t want an upper limit (for example, “8 or more”), tick No upper limit (e.g. 5+ guests).
- In Duration, choose the time for that range.
- Tap Save range.
- To change it use Edit range; to remove it, Remove range (it goes back to the default duration).
Ranges can’t overlap; shorten a range with no upper limit to add another.
Adjust what’s asked and shown in bookings
In Settings → Bookings → Configuration you have these toggles:
- Reservation Revenue: switches on revenue tracking for bookings.
- Ask for booking comments: the phone assistant, the WhatsApp assistant and the online booking page ask the customer if they’d like to add anything else. It’s on by default.
- Show booking end time: the end time appears in online booking, in emails and in WhatsApp messages.
- Customer dining area preference: when on, the phone and WhatsApp assistants ask for the preferred area, only offer areas with space and keep it if the booking is relocated after a date or time change. When off, they don’t ask and the best table is assigned (a relocation may change the area).
- Show Areas in Online Booking: on the online booking page, times are grouped by area so the customer can choose.
Change the name, logo, address or booking link
- Go to Settings → Brand.
- In the Restaurant block you can change the Logo (PNG, JPG or SVG), Name, Booking link, Address and Restaurant language.
- Tap the block’s Save button.
Booking link holds your restaurant’s identifier (for example la-guarapera); below it you’ll see the full link to your online booking page, which is the one to share. Use 3 to 64 lower-case letters, numbers or hyphens; it must be unique. If you change it, links already shared stop working.
Restaurant language is the language customers see (for example, on the booking page); it doesn’t change the app’s language.
Change colours and fonts
In Settings → Brand, use Appearance (Primary color and Corner roundness) and Fonts (tick Use a different font for headings if you want a different one for titles).
Connect WhatsApp Business
- Go to Settings → Channels and integrations → WhatsApp.
- On the WhatsApp Business card, tap Connect WhatsApp Business.
- In the Meta window, sign in and choose your WhatsApp Business account and number (if it doesn’t load, check your browser isn’t blocking it).
- When you’ve finished, the card changes to Connected and shows the name and number.
Before you connect, the card shows the Estimated monthly cost (billed by Meta) based on your Average daily bookings.
Check the WhatsApp setup steps and enable calls
Once connected, the card shows the Setup steps:
- Number active on WhatsApp: if Meta hasn’t activated it, disconnect and connect again.
- Business name approved: if Meta rejects it, change it in WhatsApp Manager.
- Business verified by Meta: only you can do this, with your company’s documents, in Meta Business Suite (How to verify your business link).
- Messaging limit of 2,000 or more: customers per day you can message. Meta raises it when you verify your business.
- WhatsApp calls: tap Enable calls when it’s available. It requires the 2,000 limit.
Tap Check again to refresh the status with Meta.
Switch on automatic reminders
- In Settings → Channels and integrations → WhatsApp, switch on Automatic booking reminders.
- In Reminders before the booking, choose 1, 2 or 3 reminders.
- In Time between reminders, choose every 2, 4, 6, 12 or 24 hours.
They’re counted back from the booking time: with 2 reminders every 24 hours, they arrive 48 and 24 hours before. They go by WhatsApp or, if that’s not possible, by email.
Connect Google Business Profile (Book button on Google Maps)
- In Settings → Channels and integrations → Google, tap Connect Google Business Profile.
- In the Google window, sign in with the account that owns or manages the restaurant’s listing and grant the permissions.
- If you have several listings, choose the right one and tap Use this restaurant.
- When you’ve finished, you’ll see Reservation button active and the Open in Google Maps option.
Your Google Maps listing will show a Book button that goes to your online booking page, and bookings from Google are identified as such. Changes to opening hours in your Calendar are sent to Google Maps; if this fails, you’ll see Google Maps hours could not be updated.
If the button stops working or you’ve changed the Booking link, tap Repair booking button.
Ask for Google reviews
- Connect Google Business Profile first (previous step).
- In the Google section, switch on Request reviews on Google Maps.
When a booking is completed, the customer receives a WhatsApp message (or email) with a link to leave a review.
Include the QR code for saving the booking to a phone
In Channels and integrations → General, switch on Wallet QR. Emails include a QR code to save the booking to Google Wallet and Apple Wallet.
Forward calls to the restaurant’s phone or PBX
When the phone assistant can’t resolve a call or the customer asks to speak to the restaurant, the call is passed to a person.
- Go to Settings → Channels and integrations → General.
- In Automatic fallback call forwarding, open Forwarding destination and choose an option:
- None: calls are never forwarded. Unresolved calls stay in the Inbox so you can call back.
- Phone number: type the number in Forwarding phone number. It saves as soon as the number is valid.
- PBX extension: fill in PBX address, Port, SIP username, SIP password and Extension, and tap Save. If your PBX filters by IP, allow the assistant’s IP.
- To remove the PBX details, tap Remove PBX credentials and confirm. No calls will be forwarded to the PBX until you save new details.
Important: use a different number from the one the assistant answers, or the call will go into an endless loop.
To forward to a PBX, your telephony provider has to give you your own PBX with a TRUNK user that allows the CID to be changed and an INVITE to be sent. What exactly to ask for, and a message to send them, are in the article Connect WhatsApp, Google Maps and telephony.
Disconnect WhatsApp or Google
On the relevant card, tap Disconnect. If you disconnect WhatsApp, customer notifications are only sent by email and the Messages menu no longer appears.
Getting started wizard (onboarding)
The first time, the app guides you step by step (Continue / Back). If you leave it halfway through, when you come back it continues at the first unfinished step.
- Welcome: Get started.
- Restaurant: Logo, Restaurant name and Address (required).
- Bookings: Default booking duration, Revenue tracking and Automatic fallback call forwarding.
- Theme: colour, corners and fonts.
- Areas: the restaurant’s zones.
- Mapping: Open floor plan editor and add at least one table or shape.
- Shifts: Add Shift.
- Calendar: at least one shift on one day.
- Ready: Go to app.
Everything can be changed later from Settings, Calendar and Customize Maps.
Rules and limits
- Only admins can change the settings.
- Duration: from 1 to 20 hours in 30-minute steps; party-size ranges can’t overlap.
- Reminders: from 1 to 3, every 2, 4, 6, 12 or 24 hours.
- Customer notifications go by WhatsApp first and, if that’s not possible, by email. Without a phone number or email no notification is sent, and that’s expected.
- Review requests need Google Business Profile to be connected.
- If no shift is open at the time, calls aren’t forwarded and stay in the Inbox.
- The forwarding number must never be the one the assistant answers.
Frequently asked questions
Do I need to tap save after changing a toggle? No, it saves automatically. Only the Restaurant block in Brand and the PBX form have a save button.
Why hasn’t a customer received the confirmation? It goes by WhatsApp (if connected and there’s a phone number) or by email. Without a phone number or email nothing is sent.
How much does WhatsApp cost? Meta bills for it; the WhatsApp card gives an estimate. Enquiries, voice notes and calls started by the customer have no Meta charge. Confirmations, reminders and review requests do.
The “WhatsApp calls” step shows as blocked. You need a limit of 2,000 messages, which Meta raises when you verify your business: complete Business verified by Meta first.
Which link do I put on my website or Instagram? The one shown under Booking link in Settings → Brand.
I’ve changed the booking link and the Google button doesn’t work. Tap Repair booking button on the Google card and update the link on your website and social media.
Can I forward calls to my mobile? Yes. In Forwarding destination, choose Phone number and type your mobile number. It must be different from the number the assistant answers.
Why wasn’t a call forwarded when I have forwarding set up? If no shift was open at the time, it isn’t forwarded and stays in the Inbox, just as if nobody answers.